 |
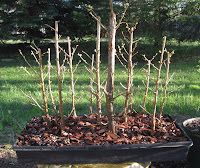
| Ken and ACBS president Mat with the completed forest on a slab. |
I have to say, Ken pulled off a hat trick with this combined demo and
workshop. As he discussed some of the basics of creating a forest
planting, Ken built this wonderful grove on a fiberglass slab. In the
photos at the right, you can see the larch seedlings spread out on the table as he selects the trees by size, thickness and number of side branches during the assembly. Ken explained why he chooses to prune the larches back at one point over another along the trunk for the forest, and how to
clip the tap root so that the seedling would fit into the group. He also discussed placeing the trees in such a way that the planting
appeared natural and not contrived.
 Having placed and worked all of the trees into the soil, he pointed out how he would next come back and prune the
height of each tree so that the largest, and more dominant trees formed the apex
of the entire composition. At the same time, the smaller trees to
the back and side contributed a sense of depth, and a feeling of the forest spread out across the horizon. There was also a sense of perspective with the smaller trees now beginning to appear further away.
 One of the of the notable points of Ken's forest was in his soil mix. In addition to the mixture of grit (haydite and builder's sand) and organic material, Ken adds sphagnum moss right into the soil mix. While some books recommend such techniques as using a mix clay and sphagnum to make a rim for a slab planting, putting the sphagnum right into the soil binds the mix, and seems to work well for holding the group in place.

In the workshop, members put together their own forest groups, although on a smaller scale, using the bundles of nine larches as well as larger seedlings.
Below are several photos of our newly created groves. (More pictures posted shortly) It will be fun to follow all of these forests over the next several years to see how they flush-out and develop--and also see them in their fall colors. In the coming years, we will add these to our Virtual Fall Show--you can see photos of trees from past autumns posted on ACBS's gallery spot at http://picasaweb.google.com/akroncantonbonsai


No comments:
Post a Comment